Some Projects Have Trouble Loading Please Review the Output for More Details
This browser is no longer supported.
Upgrade to Microsoft Edge to accept advantage of the latest features, security updates, and technical support.
Make lawmaking work in Visual Studio
Visual Studio provides a powerful integrated prepare of project build and debugging tools. In this commodity, detect out how Visual Studio can help y'all find problems in your lawmaking using build output, code analysis, debugging tools, and unit tests.
You've figured out the editor and created some lawmaking. Now, yous desire to make certain the code works properly. In Visual Studio, as with most IDEs, there are 2 phases to making code piece of work: building the lawmaking to take hold of and resolve project and compiler errors, and running the lawmaking to find run-time and dynamic errors.
Build your lawmaking
There are two basic types of build configuration: Debug and Release. The Debug configuration produces a slower, larger executable that allows for a richer interactive run-time debugging experience. The Debug executable should never be shipped. The Release configuration builds a faster, optimized executable that'due south appropriate to ship (at least from the perspective of the compiler). The default build configuration is Debug.
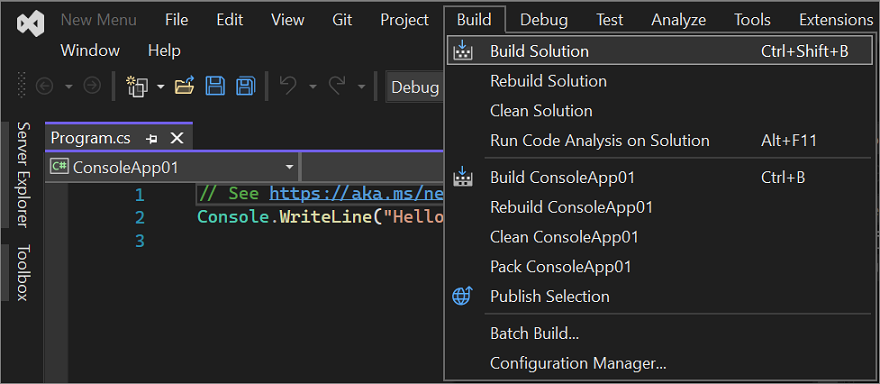
The easiest mode to build your project is to printing F7, but yous can also kickoff the build by selecting Build > Build Solution from the main menu.

You tin observe the build process in the Output window at the bottom of the Visual Studio UI. Errors, warnings, and build operations are displayed here. If you have errors (or if you accept warnings in a higher place a configured level), your build fails. You tin click on the errors and warnings to become to the line where they occurred. Rebuild your projection by either pressing F7 again (to recompile only the files with errors) or Ctrl+Alt+F7 (for a clean and consummate rebuild).
At that place are two tabbed windows in the results window below the editor: the Output window, which contains the raw compiler output (including error messages); and the Error List window, which provides a sortable and filterable list of all errors and warnings.
When build succeeds, y'all come across results like this in the Output window:

Review the Mistake List
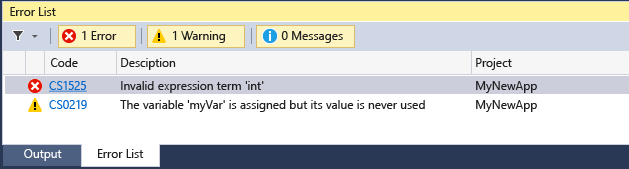
Unless yous've fabricated no modifications to code you lot've previously and successfully compiled, you probably take an error. If you're new to coding, you lot probably accept lots of them. Errors are sometimes obvious, such as a simple syntax error or wrong variable name, and sometimes they are difficult to understand, with only a cryptic lawmaking to guide you. For a cleaner view of the issues, navigate to the bottom of the build Output window, and click the Error Listing tab. This takes you lot to a more organized view of the errors and warnings for your project, and gives you some extra options equally well.

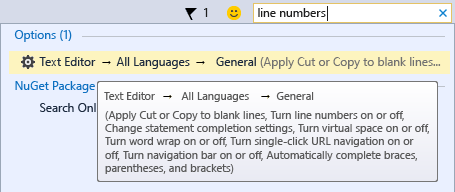
Click on the fault line in the Error Listing window to spring to the line the error occurs in. (Or turn on line numbers by pressing Ctrl+Q, typing line numbers, then choosing Turn line numbers on or off from the results. This is the fastest style to get to the Options dialog where y'all can turn on line numbers.)

Press Ctrl+G to quickly leap to the line number where the error occurred.
The error is identified past a carmine "squiggle" underscore. Hover over information technology for additional details. Make the prepare and it will get away, although you may introduce a new fault with the correction. (This is chosen a "regression".)

Walk through the fault list and accost all the errors in your code.
Review errors in particular
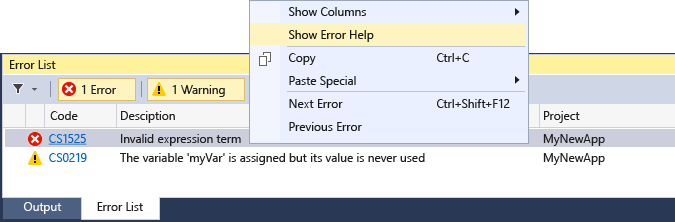
Many errors may make no sense to y'all, phrased as they are in the terms of the compiler. In those cases, you'll need additional information. From the Error List window, you tin exercise an automated Bing search for more information on the fault or alert. Right-click on the corresponding entry line and select Show Error Help from the context menu, or click on the hyperlinked error code value in the Code column of the Mistake Listing.
Depending on your settings, either your web browser displays the search results for the error code and text, or a tab opens inside Visual Studio and shows the results of the Bing search. The results are from many dissimilar sources on the Cyberspace, and not all may be helpful.
Use code analysis
Code analyzers look for common code bug that tin can lead to run-time errors or problems in code management.
C# and Visual Basic code analysis
Visual Studio includes a born fix of .Cyberspace Compiler Platform analyzers that examine C# and Visual Basic lawmaking as you type. You can install additional analyzers as a Visual Studio extension, or equally a NuGet package. If rule violations are found, they are reported both in the Error Listing and in the code editor as a squiggle nether the offending code.
C++ code assay
To clarify C++ code, run static code analysis. Make it the habit of running it once yous've cleaned upwardly the obvious errors that prevent a successful build, and have some time to accost the warnings it may produce. You'll save yourself some headaches downwardly the road, and you may learn a few code style techniques.
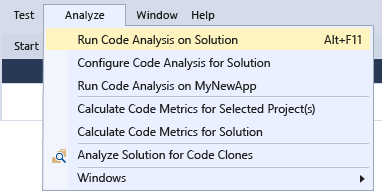
Printing Alt+F11 (or select Clarify > Run Code Analysis on Solution from the top carte du jour) to start static code analysis.
Any new or updated warnings appear in the Fault Listing tab at the lesser of the IDE. Click on the warnings to jump to them in code.

Use Quick Actions to set or refactor code
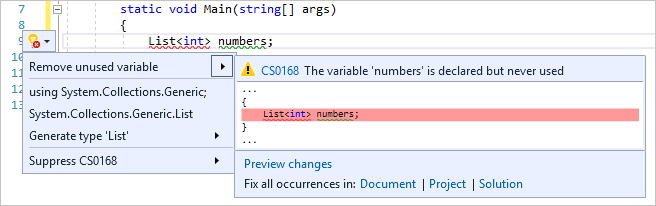
Quick Actions, available from the light bulb or screwdriver icon, let you refactor code inline. They are an easy way to gear up common warnings quickly and effectively in C#, C++, and Visual Basic code. To access them, right-click on a warning squiggle and select Quick Actions and refactorings. Or, when your cursor is on the line with the colored squiggle, press Ctrl+. or select the calorie-free bulb, error light bulb, or screwdriver icon in the margin. You'll see a list of possible fixes or refactorings yous can utilize to that line of code.
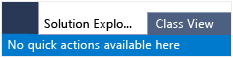
Quick Actions can be used wherever lawmaking analyzers decide there's an opportunity to fix, refactor, or improve your code. Click on whatsoever line of code, correct-click to open the context card, and select Quick Actions and refactorings. If refactoring or comeback options are available, they are displayed. Otherwise, the message No quick actions available hither displays in the lower-left corner of the IDE.
With feel, you lot can chop-chop use the arrow keys and Ctrl+. to check for easy refactoring opportunities and clean up your code!
Run Lawmaking Cleanup
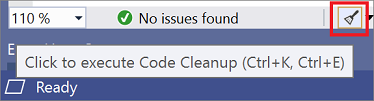
Visual Studio provides on-demand formatting of your C# code file, including lawmaking style preferences, through the Lawmaking Cleanup push button at the lesser of the editor.
In improver to formatting your file for spaces, indents, et cetera, Lawmaking Cleanup as well applies a gear up of code style conventions that you define. Your preferences for each lawmaking manner are read from the EditorConfig file, if you have one for the project, or from the code style settings in the Options dialog box.
Debug your running code
Now that you've successfully built your lawmaking and performed a lilliputian make clean up, run information technology by pressing F5 or selecting Debug > Get-go Debugging. This starts your app in a debug environment so you can find its beliefs in item. The Visual Studio IDE changes while your app is running: the Output window is replaced by two new ones (in the default window configuration), the Autos/Locals/Watch tabbed window and the Telephone call Stack/Breakpoints/Exception Settings/Output tabbed window. These windows have multiple tabs that permit you to inspect and evaluate your app's variables, threads, telephone call stacks, and various other behaviors as information technology runs.

Cease your app by pressing Shift+F5 or by clicking the Stop push button. Or, you can only close the app's main window (or command-line dialog).
If your lawmaking ran perfectly and exactly as expected, congratulations! Notwithstanding, if it stops responding, or crashed, or gave you some strange results, you lot'll need to find the source of those bug and fix the bugs.
Set simple breakpoints
Breakpoints are the virtually basic and essential feature of reliable debugging. A breakpoint indicates where Visual Studio should append your running code so you can take a look at the values of variables, or the behavior of memory, or whether or not a branch of code is getting run. You don't need to rebuild a projection after setting and removing breakpoints.
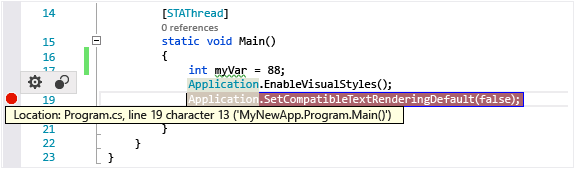
Gear up a breakpoint by clicking in the far margin of the line where you want the interruption to occur, or press F9 to gear up a breakpoint on the electric current line of code. When you run your code, information technology will pause (or break) before the instructions for this line of code are executed.
Common uses for breakpoints include:
-
To narrow down the source of a crash or unresponsive program, besprinkle breakpoints throughout and around the code of the method call yous call back is causing the failure. As you run code in the debugger, remove and then reset the breakpoints closer together until y'all observe the offending line of code. See the adjacent section to learn how to run code in the debugger.
-
When you introduce new code, set a breakpoint at the beginning of it, and run the code to brand sure information technology is behaving equally expected.
-
If yous've implemented a complicated behavior, set up breakpoints for the algorithmic lawmaking and so you tin audit the values of the variables and information when the program breaks.
-
If you're writing C or C++ code, use breakpoints to terminate the code so yous can audit address values (look for NULL) and reference counts when debugging for retentivity-related failures.
For more information about using breakpoints, read Using breakpoints.
Inspect your code at run-time
When your running lawmaking hits a breakpoint and pauses, the line of lawmaking marked in yellowish (the current statement) has not executed yet. At this indicate, y'all may want to execute the current statement and so audit the changed values. You can apply several stride commands to execute code in the debugger. If the marked code is a method phone call, you can step into information technology by pressing F11. You can also stride over the line of code by pressing F10. For boosted commands and details on how to step through code, read Navigate code with the debugger.

In the preceding illustration, you can advance the debugger one statement by pressing either F10 or F11 (since at that place is no method call here, both commands have the same result).
While the debugger is paused, y'all tin can inspect your variables and telephone call stacks to decide what is going on. Are the values in the ranges you expect to see? Are calls being fabricated in the right order?
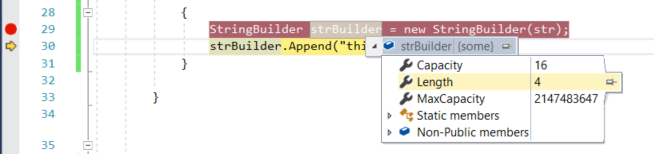
Hover over a variable to encounter its current value and references. If you encounter a value you lot didn't expect, y'all probably have a bug in the preceding or calling code. For more than in-depth debugging data, learn more well-nigh using the debugger.
Additionally, Visual Studio displays the Diagnostic Tools window, where y'all can find your app's CPU and retention usage over time. Subsequently in your app development, you tin can use these tools to look for unanticipated heavy CPU usage or retention allotment. Use information technology in conjunction with the Watch window and breakpoints to determine what's causing unexpected heavy usage or unreleased resource. For more information, encounter Profiling feature tour.
Run unit tests
Unit of measurement tests are your first line of defense against code bugs because, when done correctly, they test a unmarried "unit of measurement" of code, typically a single office, and are easier to debug than your full program. Visual Studio installs the Microsoft unit of measurement testing frameworks for both managed and native code. Employ a unit of measurement testing framework to create unit tests, run them, and written report the results of these tests. Rerun unit of measurement tests when you lot make changes, to examination that your code is still working correctly. With Visual Studio Enterprise edition, you can run tests automatically after every build.
To get started, read Generate unit of measurement tests for your lawmaking with IntelliTest.
To learn more most unit of measurement tests in Visual Studio and how they can assist you create better quality lawmaking, read Unit test nuts.
See besides
- First wait at the debugger
- Larn more than well-nigh using the debugger
- Generate and set up code
Feedback
Submit and view feedback for
Source: https://docs.microsoft.com/en-us/visualstudio/ide/find-and-fix-code-errors
0 Response to "Some Projects Have Trouble Loading Please Review the Output for More Details"
Post a Comment