How to Add an Art Board on Pc Illustrator
Working with artboards
Artboards represent the regions that tin contain printable artwork, similar to pages in Adobe InDesign. Y'all can use multiple artboards for creating a multifariousness of things, such as multiple-folio PDF files, printed pages with different sizes or different elements, independent elements for websites, or video storyboards, for instance.
Calculation artboards to the document
You tin can add and remove artboards at any time while working in a certificate. You tin create artboards in unlike sizes, resize them with the Artboard tool ( ) or Artboards panel (
 ), and position them anywhere in the Document window. All artboards are numbered and can have a unique name assigned to them.
Adjacent, y'all will add two more artboards to the document. Since this is a ticket for a sporting event that volition fold, each artboard will be a different confront of the ticket (front end, inside, and dorsum).
- Choose View > Fit Artboard In Window, then press Control+– (Mac Os) or Ctrl+– (Windows) to zoom out.
-
Printing the spacebar to temporarily access the Hand tool (
 ). Drag the artboard to the left to meet more than of the darker sheet off the right side of the artboard.
 -
Select the Artboard tool (
) in the Tools panel. Position the Artboard tool pointer to the correct of the existing artboard and in line with its top edge (a green alignment guide appears). Drag downwards and to the right to create an artboard that is iii.5 in (width) by 6 in (height). The measurement label indicates the artboard size.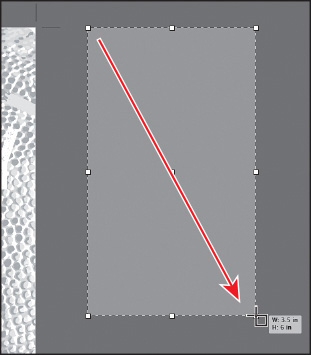
-
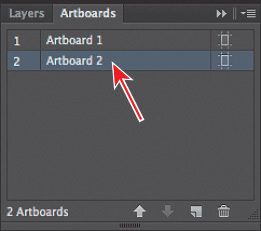
Click the Artboards panel icon (
) on the right side of the workspace to evidence information technology.The Artboards panel allows you to see how many artboards the document currently contains. It likewise allows yous to reorder, rename, add together, and delete artboards and to cull many other options related to artboards. Find that Artboard 2 is highlighted in the panel. The active artboard is always highlighted in this panel.
Next, you volition create a re-create of an artboard using this console.
-
Click the New Artboard push button (
 ) at the bottom of the panel to create a copy of Artboard ii, called Artboard 3. The copy is placed to the right of Artboard 2 in the Document window.
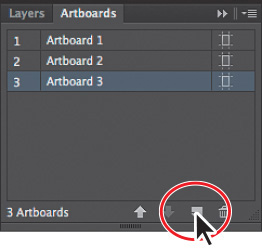
-
Cull View > Fit All In Window to see all of your artboards and get out the Artboard tool selected.
Editing artboards
After creating artboards, y'all can edit or delete artboards at whatever time by using the Artboard tool ( ), menu commands, or the Artboards panel. Adjacent, you will reposition and change the sizes of several of the artboards using multiple methods.
-
Press Command+– (Mac Bone) or Ctrl+– (Windows) twice to zoom out further.
-
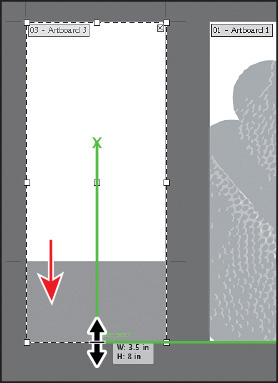
With the Artboard tool (
) still selected, elevate Artboard three from the center, to the left of the original (larger) artboard. You tin can reposition artboards at whatever fourth dimension and even overlap them, if necessary. -
With the Artboard tool selected, elevate the bottom-centre bounding point of the artboard down until the height is 8 in, every bit shown in the measurement label. The bottom will snap to the bottom of the larger artboard to its right and a green alignment (smart) guide will appear.
Another way to resize an artboard is to do and so by entering values in the Control panel, which is what you lot'll do next.
-
Click Artboard 2, to the correct of the larger artboard in the middle. "Artboard 2" will be highlighted in the Artboards panel. Select the upper-heart point in the reference signal locator (
 ) in the Control panel. Modify the height to 8 in the Command panel and press Enter or Return to take the value.
Selecting the upper-middle point allows y'all to resize an artboard from the height, eye of the artboard. Past default, artboards are resized from their heart.
In the Control panel, with the Artboard tool selected, yous will run into many options for editing the currently active artboard. The Preset card lets you lot change a selected artboard to a prepare size. Notice that the sizes in the Preset menu include typical print, video, tablet, and Web sizes. You can also fit the artboard to the artwork bounds or the selected fine art, which is a great manner to fit an artboard to a logo, for instance. Other options in the Control panel include the ability to switch orientation, rename or delete the artboard, even bear witness other helpful guides like a eye point or video-condom areas.
-
Select the Selection tool (
 ), and choose View > Fit All In Window.
Notice the very subtle black outline effectually Artboard 2, with "2" showing in the Artboard Navigation menu (lower-left corner of the Document window), and "Artboard 2" highlighted in the Artboards panel, all of which indicate that Artboard two is the currently agile artboard. There can only exist ane agile artboard at a fourth dimension. Commands such every bit View > Fit Artboard In Window utilise to the active artboard.
Renaming artboards
By default, artboards are assigned a number and a proper noun. When you lot navigate the artboards in a document, information technology can exist helpful to proper noun them. Next, y'all are going to rename the artboards and so that the names are more than useful.
-
In the Artboards panel, double-click the name "Artboard one." Modify the name to Within, and press Enter or Render.

You will now rename the residual of the artboards.
-
Double-click the Artboard Options icon (
 ) to the right of the name "Artboard two" in the Artboards panel. This opens the Artboard Options dialog box.
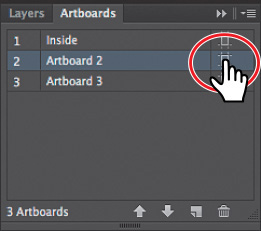
-
In the Artboard Options dialog box, change the Name to Back and click OK.
The Artboard Options dialog box has a lot of actress options also every bit a few nosotros've already seen, like width and height.
- Double-click the proper name "Artboard 3" in the panel, and change the name to Front. Press Enter or Return to accept the name.
- Choose File > Relieve, and continue the Artboards panel showing for the next steps.
Reordering artboards
When you navigate your certificate, the order in which the artboards announced can be important, especially if you are navigating the certificate using the Side by side artboard ( ) and Previous artboard (
 ) buttons. By default, artboards are ordered according to the social club in which they are created, just y'all tin change that gild. Side by side, you lot will reorder the artboards in the Artboards console.
-
With the Artboards panel still open, double-click the number i to the left of the name "Inside" in the panel. This makes the artboard named "Inside" the active artboard and fits it in the Document window.
-
Click and elevate the "Front" artboard proper noun up until a line appears higher up the artboard named "Inside." Release the mouse button.
This moves the artboard up in order so that it becomes the get-go artboard in the listing.
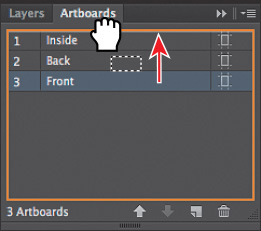
- Double-click to the right or left of the name "Forepart" in the Artboards panel to fit that artboard in the Document window, if necessary.
-
Click the Next artboard button (
) in the lower-left corner of the Document window to navigate to the next artboard (Inside). This fits the Inside artboard in the Document window.If yous had non changed the order, the next artboard would take been dimmed since information technology was the last artboard in the Artboards console (there was no artboard after information technology).
- Choose File > Save.
Now that the artboards are fix up, y'all will concentrate on transforming artwork to create the content for your project.
Source: https://www.adobepress.com/articles/article.asp?p=2262134&seqNum=2
0 Response to "How to Add an Art Board on Pc Illustrator"
Post a Comment